Tag Archives: striking

Shoulder Stabilziation for Striking: are you Focusing on the Right Muscles?

When considering upper body striking, martial artists tend to focus on the pectoral, triceps and deltoid muscle groups, and the glenohumeral (GH) joint, which is the most obvious shoulder joint. The GH joint consists of the humerus and the glenoid fossa of the scapula (the “socket” of the shoulder blade). Since this joint is essentially like a ball resting on a shallow dish, and not a deep socket like the hip joint, ligaments and the attached muscles provide most of the stability. There are also three other joints in the shoulder complex that play important roles in maintaining stability for the GH joint, with the scapulothoracic being most prone to abuse in combative training. This joint is formed by the fibrous connection of the scapula to the posterior torso wall, which allows the scapula to glide and rotate as the GH joint requires.

The serratus  anterior and the trapezius provide the ability to adduct (pull close to the ribcage), retract, depress, and upwardly or downwardly rotate the scapulae.  They maintain alignment of the glenoid fossa  with the head of the humerus.  A strong, reasonably flexible rotator cuff group is important, but the trapezius needs to be able to provide rotation and stabilization so that the GH joint stays centered and the rotator cuff isn’t impinged. The trapezius and serratus need to work synergistically with the GH joint movers. Striking in general requires the same coupling of scapular and humeral actions that has been reported for other overhand actions  (Kibler, et. al., 2007) such as the tennis serve.

Continue reading

A Brief Discussion on the Relativity of Skills

Ed. Note: while the examples used in the piece below relate to punching and recreational/athletic MA training, the concepts can easily be applied to all other fighting skills and situations in which they might be used.

How many ways are there to skin a cat? Or in this case, throw a punch? Among both novice and experts (and “experts”), it can seem as if there is a “right” way to perform a fighting skill, yet variations are to be found from style to style,  from individual to individual, and even from moment to moment within the same encounter. The Q & A below came out of a discussion with martial artist and CSCS Daniel Ramos (fellow ATSU Human Movement Science alum).

Continue reading

Random Training Notes 16: Heavy Bag Tips

  • Move the bag where you want it to go, don’t stay flat-footed or let it move you
  • Hit it as it approaches and as it moves away
  • Karate etc. folks: forget the stances and think about mobility, forget the pull back unless there is something to actually grab
  • Work the bag at different ranges and heights. Think about 3-5 strike combinations that move up and down the bag at face and torso heights
  • Explore close range hooks, uppercuts, elbows and knees. Your vocabulary can include more than straight punches or swings
  • Avoid throwing swings- get close enough for hooks to stay tight, or be far enough that you can extend the arm 3/4 before impact
  • Explore hitting the bag at non-optimal ranges and angles to simulate non-optimal conditions
  • After each strike return to a guard that allows you to protect your face. Be watchful of the tendency to drop the hands after strikes
  • Strike ballistically. Let the shoulders move faster than the hips. Motivate the strike from the shoulder, don’t tie it to the slower movement of the torso
  • When going for impact, a higher-pitched ‘smack’ is a good sign, dull thuds are a sign of lower velocity
  • Follow through is important, but do not adopt the habit of pushing into the bag
  • A good round kick should fold the bag, not just bump into it
  • Front kicks may land with more force if you use the heel instead of the ball of the foot
  • If you train with a group that questions the need to ever hit things, spend some time hitting the bag and see how you do. All the air-punching in the world doesn’t do much for teaching one how to hit hard. Somewhere along the way this became a controversial idea in some circles
  • If you train on the bag hard and heavy quite frequently, consider giving your arms and shoulders a break by incorporating 1-2 week recovery periods and investing time into regular stretching for the pectorals, biceps, triceps, lats, trapezius, rhomboids and rotator cuff muscles

Related posts and info:

Getting More Out of Your Heavy Bag

Power Hitting Training Tips

Rotator Cuff Injury Prevention Tips

Another Dead Makiwara, pt. 2

RIP, Ude Makiwara 1.0. Felled by a roundhouse kick in the prime of life. I put this thing in the ground roughly four years ago, and aside from the fungal growth around the bottom  it held up pretty well.  I learned more from this thing about how to actually hit than from anything else. Fortunately, I just happen to have a fresh log on hand for 2.0…

Random Training Notes 13

When training combinations on a heavy bag or pad, or working combos in sparring, pay close attention to what your hands and arms do immediately following and between strikes. A few tendencies are very common:

  • dropping the hand to waist height in between strikes with a bent elbow
  • pulling the hands all the way past the lateral line behind the body
  • letting the entire arm hang straight at the waist

These are common habits, especially among people who are new to training, bag work or successive sparring. People who train in arts that emphasize a “pullback” motion in tandem with every strike are especially prone to it, and it’s a habit that should be discouraged. I understand the utility of a pullback to create a force-couple with the target, but it is absolutely useless unless something is actually being grasped and pulled back- keep the other hand near your face, where it can serve a purpose (keeping your face from being rearranged).

Ideally, you want to train in the habit of returning the hands to a guard that covers the face following each strike. I prefer a higher guard, but the happy medium between people’s personal preferences is one that places the hands someplace between the chin and temple. If this is something that you or a student has a hard time doing, try the following strategies:

  • Adopt the habit of keeping your thumbs or palms in contact with your temples. You may not prefer a guard that is quite this high, but the tactile feedback of the thumb contact often works better than repeated verbal coaching about the location of the hands. Once you begin returning naturally to this position, thumb/skin contact with the temples is no longer necessary.
  • Put your bag near a mirror (or a mirror near your bag) so that you can watch what your hands do.
  • Ask a trusted training partner to slap you lightly in the face when your hands drop during a drill. Touching may get the idea across, but a few light slaps will provide quite a bit more motivation to keep your guard up between strikes.
  • Take a resistance cable or band with moderate tension and wrap it across your upper back, in line with the shoulders. Grasp the handles at roughly chin height. As you strike the bag (lightly) the cable will produce higher tension, providing an external motivation to return them to your face as opposed to dropping. Don’t let the tension cause your elbows to flare too wide from the body.

Random Training Notes 11

Striking is the act of fitting a weapon to a target. Availability of targets may change very quickly, availability of weapons may change very quickly.  Learning to recognize these changes and adapt to them requires more time spent striking targets that are moving unpredictably and changing range than targets moving predictably or not moving at all. The speed and intensity of these activities should be varied to emphasize different attributes: tracking/accuracy, reaction time, fluidity, and power. Tracking, fluidity and reaction time are more important than focusing exclusively on power.  Reflection on which changes in target and range present the most difficulty is vital.

Linked Study: How Boxers Decide to Punch a Target: Emergent Behavior in Nonlinear Dynamical Movement Systems

How Boxers Decide to Punch a Target: Emergent Behavior in Nonlinear Dynamical Movement Systems

Hitting a moving target is one of the most inherently athletic skills that I can think of, and it’s an absolutely vital element in a martial artists’ tool box.  I’m a strong advocate of the “hands off” approach of giving a student the conditions in which to explore range and which weapons to apply at different- and changing- ranges. Light moving targets, stationary targets, heavy moving targets and sparring all play an important role.

I’m amazed at how many conversations I’ve had with earnest karate/TMA people wherein they insist that distancing, timing, impact force management and the selection of the appropriate weapon (strike/technique) are best learned with minimal- or no- bag and target work. While some “traditional” martial artists insist that learning how to effectively hit something takes years to develop and master, it’s painfully obvious that a novice student can develop considerable skill in far less time if he or she is allowed to experience feedback instead of endless, abstract technical instruction. Several findings of the study provide insight into why this is so:

By allowing novice boxers
during the basic training sessions, when the
heavy bag practice is mostly used, to explore the
whole spectrum of constraints enabled by each
combination of parameters, they would learn
how to adjust emergent motor solutions to the
hitting task which are specific to their individual
organismic constraints. Once these efficient
coordination patterns have been established with
the heavy bag, learners could move to the task of
hitting moving opponents during light sparring…

…Novice boxers are able to discover and exploit
the scaled performer – target distance region that
affords maximization of the unpredictability (H),
diversity (S) and the efficiency ratio (E) of their
punching actions…

…Spontaneous emergence of boxer – boxer
coordinative states and strategic positioning as a
consequence of boxers’ perception of essential
interacting constraints points to the possibility
that practice should be less loaded with verbal
instructions from the coach to impose decisions.
Rather, practice could be directed towards
creating a variety of learning situations (by
manipulating the dynamics’ constraints) in
which trainees would themselves explore,
discover and thus adapt to the information …

Link: Historical Pankration

Take a look at here for a large library of artistic representations of the combat sports from ancient Greece and Rome. Just about any technique that you might see in modern boxing, wrestling, Judo or MMA is represented.

The pig-on-a-rope punching bag under “Training Methods” is a particular favorite, but I doubt that I will be running out to the slaughter house any time soon.

As people debate naively on about which style or art is the best, these pieces are a nice reminder that there are only so many ways that one can punch, strike, kick, strangle or throw someone else.  No one art or culture  has any particular claim to any of them. Every culture has developed fighting methods, so a functional  similarity should be expected.

More TKRI Video Links: Core Work, Agility Ladder Punching, Dynamic Makiwara Work

We had a lovely night of good, hard training on Tuesday, and I brought along the camera to get some examples of our performance/power phase training on video.

The first clip demonstrates a side plank. To many, “core exercise” is interpreted as doing lots of situps. Situps target the hip flexors more than the abdominal muscles, and are actually counter productive for this purpose.  Side planks strengthen the recruitment of the abdominal obliques and associated core stabilizer muscles. The variations demonstrated here further involve the stabilizer muscles around the shoulder, elbow, hip and knee joints in conjunction with added leverage against the core muscles.

The next few clips demonstrate agility work on a tape “agility ladder.” While moving down the ladder, the student is focusing on exploiting the rebound from stored kinetic energy to move lightly and quickly but powerfully. Hitting the pad at the end of the ladder gives the student an opportunity to experience how momentum and the drop-step can produce fast, powerful punches. As the pad holder advances, the student works on employing the same stability and agility while moving backwards and throwing punches as fast as possible, using the feet to dig in to strike forward powerfully.

Dave Campbell,  shown in two of these clips, underwent complete reconstruction of his left knee two years ago. This type of training, progressing gradually from slow to full speed, has helped him to regain mobility, power and speed.

This last clip is a very short sample  of makiwara work done in a more dynamic fashion. Instead of thrusting with the body as is commonly seen in karate, the student is punching ballistically, initiating with the chest and arm to generate speed. The momentum and drive of the body is linked upon impact. Although the hips are involved as a rotational center, the drive is primarily generated by the active propulsion of the legs. The rear heel is allowed to lift and drive forward, contributing to the forward momentum and allowing stored kinetic energy to rebound into the strike. Keeping the heels flat negates the rebound, lessening the dynamism and power generated, and also encourages excessive strain on the medial aspect of the knee and compression on the posterior lumbar spine.

Thrusting with the body produces a punch that is encumbered by the agonism of the latissiumus dorsi. Although it may feel powerful, such thrusting actually lessens the velocity of the punch, subtracting substantially from the power generated.

The Ude Makiwara Part 6: Sample Training Clip

In the final installment of the “Ude Makiwara: Notes on History, construction and Usage”, I mentioned that I would soon post some video clips of  drills and training methods. It’s been more than a year and I’m finally getting around to putting some of these videos together-yeah, so timeliness is not a strong suit. The video linked below shows a very basic progression from simple straight punching into combinations utilizing circular strikes and basic footwork. In the next few weeks I plan to get some more videos up showing different drills that progress from simple skills to more sophisticated ones .  (Ed. note: After 3 years of hard use, I broke the original model, so more training clips will be put on hold until a build and install a new one…)

Grabbing at Dynamite: Punching Outside of the Karate Box

“I can’t sing and I can’t dance, but I can lick any SOB in the house.”

-Jack Dempsey

Note: this essay grew out of notes for an as yet unfinished review of Jack Dempsey’s 1950 book “Championship Fighting: Explosive Punching and Aggressive Defense” and personal notes that developed over the course of a year of intensive work on punching


What does a black belt know about punching?

I first read about Jack Dempsey in an article written by Brian Kennedy and Elizabeth Guo for Classical Fighting Arts in 2006. The article, entitled “Jack Dempsey, Master of Xingyiquan” focused on a boxing manual written by the 1919 heavy weight world boxing champion. As I began reading the article, I wondered what an old-school Western boxer had to do with an Asian martial art, or karate training in general. I was still in the “karate is superior to boxing because it uses the whole body” phase of thinking that some people go through early on in their training (and some never leave, to their detriment). The book in question, “Championship Fighting: Explosive Punching and Aggressive Defense” (1950) seemed quaint and outdated, right down to the rolled up sleeves and pompadours in the accompanying illustrations. By the end of the article however, my interest was piqued, and suddenly my dichotomous conceptions of boxing and karate began to mutate some. The utter clarity of Dempsey’s cited examples set off a new train of thinking: regardless of styles or arts, punching is punching. Using the fists to damage or knock another person out is a skill that is governed by the same principles, regardless of the art that develops it. We all practice the “two hands, two feet, one head” style of fighting.

We all practice this style, but the training methods that one chooses to pursue can either develop or detract from making it practical and usable. After reading this article, I began to look objectively at the differences between the way that a boxer trains a punch and the way that karate people- both in general and at my particular dojo- trained punching. Before long, I reflected that boxers, on average, spend far more time than karate people hitting things: stationary targets, heavy bags, focus mitts, reflex bags/balls, and of course, other people (yes, there are exceptions, but I am addressing generalities here). Their learning environment is incredibly rich with varied stimulus (static targets, moving targets, responsive targets, non-responsive targets) and opportunities to apply their skills under varying levels of pressure. Simply put, the best way to get good at hitting things is to hit things. I had earned shodan a year earlier, but I did not feel like I was hitting any harder, faster or better. Despite the fact that the dojo I trained in spent a considerable amount of time on pad work, and a makiwara and heavy bags were present and well-used, it was clear to me that despite hard, frequent training, my own punching ability was not what it needed to be (and this is in no way a disparaging reflection on my teacher- it was a critical look at my own pursuit of the skill).

Continue reading

Flash Cards of Doom

I’ve noticed lately that during my personal training time, I tend to default to a few combinations when it comes to working the heavy bag or ude makiwara. I may reshuffle the various techniques into different orders, but after awhile the same 4-5 strikes manifest themselves. Straight left, outside right hook, lead uppercut, hammer fist on the return, etc. There’s nothing wrong with having a few specialty techniques ingrained from doing lots of bagwork and from sparring experiences, but at some point a habit becomes a limitation.  A problem made itself obvious: how can I incorporate a degree of randomness into this training time, thereby moving outside of certain habits, without becoming unproductive? I’ve also noticed that people learning karate generally learn best when they have “discovered” something for themselves rather than being given every minute detail and then told to master it all.  So how to incoproprate this into my solo training, as well as for working with others?

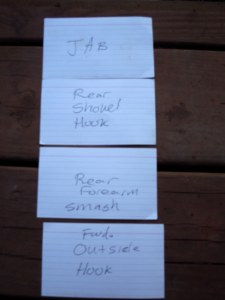
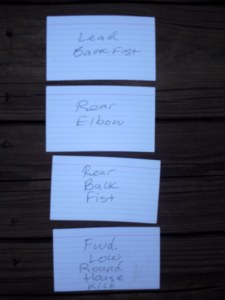
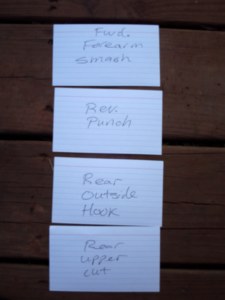
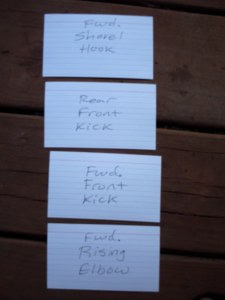
In between rounds on the heavy bag last night, my mind wandered to thinking about getting some index cards for making flashcards of each unfamiliar word or phrase that I come across as I read through a collection of Latin American short stories in Spanish (another summer project).  Look it up, use it in a variety of contexts, combine it with what I already know, learn it . And as I went back to the bag, I wondered “why not do that with striking combinations?” So I grabbed 50 or so index cards and wrote a different strike on each one:

Jab

Reverse punch

Shovel hook

Outside hook

Uppercut

Palm strike

Shuto

Haito

Forearm smash

Elbow smash

Rising elbow

Backfist

Reverse backfist

Front kick

Roundhouse kick

Knee Strike

For each strike I also included cards with simple variations, such as front hand/leg, rear hand/leg, low and high, to address all of the variables for using that technique. I also threw in some ‘wild cards’ that read “switchback,”  “turning,” and “shifting” to incorporate some basic footwork into the deck. The result? A very effective way to train combinations and force your body to work in ways that you might ordinarily neglect. Below are four samples of random combos that I drew while training yesterday evening:

PICT0566PICT0570

PICT0569PICT0568

In these FOD (Flashcards of Doom) I found a very effective answer to my problem. Partner or not, I can shuffle through the deck and stretch both my brain and body a bit. I had a couple of willing students try them while doing some pad work this morning, with very good results. By the end of it they were moving through even the most counter-intuitive combos with fluidity and power.   Give it a shot- just get a packet of index cards and write out your vocabulary of strikes and footwork. When you come across techniques that are new to you, or that you are uncomfortable with using freely, add them to the deck. Shuffle thoroughly and you’ve got hours of fun on your hands. Well, maybe not fun, but you will find yourself working combos that you’ve never thought of, and realizing that you have certain bad habits (dropping your hands between techniques, bad balance in transitions, pausing when throwing continuous strikes from the same limb etc). And you’ll be suprised at how much the random combo training eimproves the rest of your practice.

The Ude Makiwara, pt. 5

Part 5 of 6. Footnotes, references, and demonstration video clips will be posted in the last entry.

Stick and Move

Now that the whole thing is firmly in the ground and well padded, what exactly can one do with it? For starters, try out a straight reverse punch. As with all makiwara practice, take it slow at first. If tenderness begins to develop around the proximal phalanges, in the carpal or metacarpal areas when making a fist, this is a sign that your alignment is off and you are hitting too hard for your hand. Take a few days or weeks off from hitting anything hard until the discomfort subsides, and begin lightly when resuming training on this makiwara. Since the shape of the ude makiwara is rounded as opposed to flat, these sorts of injuries are very easy to rush into. Punches with a curved trajectory will probably feel awkward, particularly if you are only used to throwing straight “karate” punches, or hitting bags. Even a solid makiwara-conditioned wrist will have a tendency to hyper extend as it deals with the circumference of the impact area. Using a tate or vertical/standing punch might feel more reliable to you than the standard corkscrew type punch. The wrist is generally stronger in a vertical postion as opposed to  fully pronated.

Experiment with light strikes from different ranges and vectors of movement, noting hand, wrist, elbow and shoulder alignment. I recommend limiting yourself to three sets of ten punches per hand for the first several sessions. Apply this plan to the different types of punch and strike; becoming fmailiar with a straight punch on the ude makiwara is not the same as being used to throwing hooks or uppercuts, so spend some time working on them seperately.  After several sessions of moderated acclimation, the fun can begin.

The main advantage of the round design is the expanded striking area afforded by its shape. Critics of makiwara training often cite that the flat post only offers one surface to strike, thereby making it an unrealistic training experience. While I find this to be a misinformed perspective, I do agree that a flat makiwara does limit the techniques that can be trained upon it. This is not an issue for the ude makiwara. Combinations of punches can be thrown to the sides of the post while facing it straight on, such as jab/hook/elbow. As another example, a roundhouse kick can be followed by an elbow smash without having to readjust the body. Performing a switchback with the feet allows you to repeat strikes and combinations with both sides of the body in alternation.  Striking from different angles will highlight a poorly centered punch in that it will  simply graze off of the  circumference. If your knuckles are not properly aligned, a very hard punch might seem to “bounce” off of the surface. Again, if discomfort develops anywhere in the punching arm, a misalignment of the impact surfaces or supporting joints is indicated.

This feedback, if heeded, provides a valuable insight into the technique being practiced. Since karate techniques will be applied bare-knuckled in the context of a violent encounter, it is imperative that practitioners have an awareness of exactly which knuckles are making contact at the termination of punches, especially rounded ones. Throwing a hooking punch changes the alignment of the standard “karate” straight punch and often places the unsupported metacarpal bones of the ring and little finger in line to absorb the impact, which can have very unpleasant results.11 This is easy to miss when hitting a bag (very firm ones being an exception), which will deform enough to accommodate the fist wherever it lands. A blow that may well damage the hand on a more rigid target will still feel powerful without any negative feedback aside from a scraped knuckle. But considering that the human face is made up of rather bony structures, a refined awareness of knuckle alignments on all punching trajectories is an imperative skill to develop.

Striking the makiwara from different angles can also highlight any weakness in the muscular contraction around the shoulder joint and torso, and throughout the body, during the delivery of rounded and hooking punches. A hooking punch that is not ‘connected’ via muscular contraction to the body core will produce a feeling of separation in the shoulder joint as the body follows through and the arm stays behind, absorbing most of the impact, and losing power at the joint. This particular problem is  not as evident against a bag, where the punch will still move the target regardless of anatomical efficiency (or lack thereof). If the shoulder is driven upwards upon impact more contraction of the shoulder girdle, lats, serratus anterior is needed to stabilize this area (on impact- tensing before impact will slow the punch and rob it of power). Likewise if the shoulder is raised in anticipation of this rebound, the punch will feel as though it bounces lightly off the makiwara, regardless of body follow through. Extending the arm into a wider hook will concentrate this feedback at the elbow and indicate where a weakness has developed there. Fully committed body rotation behind a punching arm strongly integrated (via contraction of the shoulder/lat etc.) to the body will provide a blow that transfers power smoothly from the drive of the legs to the target without losing any in the displaced shoulder joint. The ude makiwara can inform bag work as an adjunct for ‘fine-tuning’ and naturalizing properly supported form. Alternating between striking the ude makiwara and striking the heavy bag is a good way to higlight bad habits and problems that may develop unnoticed on either tool if used alone.

Since the ude makiwara may be struck from all angles the practitioner is not limited to one general direction of movement. “Walking the circle” drills can be utilized, allowing the user to move around the target, letting the techniques be trained in a free-moving manner, also good for reinforcing an awareness of the ever-changing centerline. The same mobility can be experienced with a hanging or standing bag, although the ude makiwara offers feedback and rotational conditioning that are lacking in bags.

In the absence of training partners, arm conditioning may be pursued on the ude makiwara. Inward and outward blocks/strikes can be thrown in succession without constant readjustment, also motivating hip rotation. There are no angles to be avoided, and the round shape provides a surface that is similar to the curves of an arm or leg. As such, the impact feels a bit more concentrated than with a flat surface. A word of caution: take care that the elbow joints are not locked, and no more than ¾ of the way extended to provide some protection to the joint upon impact. Hitting this target with the arms locked will damage the joint as intensity is increased; pay attention to stiffness and pain between uses, a sensation not unlike tennis elbow. Avoid slamming the lateral and medial edges of the forearm into the post, as the ulnar and radial nerves/arteries run along the respective bones. Forearm smashes should likewise be inclined towards the posterior surface to avoid compressing these pathways. Since the arms can be used in alternation, everything may be done while moving around the makiwara to add variety to training and incorporate footwork.

Virtually all of the strikes in the karate vocabulary may be practiced on this makiwara in conjunction with free moving footwork. Individual techniques can be worked into more dynamic drills as well with the makiwara serving as a proxy for another person. All of these techniques can be worked on both arms in succession, or with a combination of other techniques. Forearm smashes and elbows thrown with alternating arms provides good motivation for core rotation behind the techniques, distancing for close-in fighting and a good general workout (such as Tabata Protocol style “burst training”). Alternating roundhouse kicks against an unomving (but springy) target develops good commitment to the kicks. Shifting off the center from a designated ‘front side’ while utilizing rolling hands or two handed parrying into counter strikes provides nice training for shifting off an attack and counterattacking along an opponent’s weak angle. Sanchin style takedowns can be conditioned by shifting around the makiwara and entering with a close strike followed by hooking the leg around the post as the upper body drives into it.

In closing, I would hope that the information presented in this article lives up to the final comments in Funakoshi’s makiwara appendix in Karate-do Kyohan: “The makiwara is suggested simply because it can be made cheaply and easily; thus anything can be made with some ingenuity, without too much cost, and with readily available materials will be suitable.”

Next: Part 6, in which some training methods for the ude makiwara will be demonstrated

The Ude Makiwara, pt. 4

Part 4 of 6. Footnotes, references, and demonstration video clips will be posted in the last entry.

Now Dig It

Securing this makiwara in the ground is a similar process to installing a regular one, but there are a few additional considerations. It will be hit from all sides, meaning that bracing has to be attached to accommodate force coming from all directions as opposed to just one. This can be achieved using 4” screws to attach lengths of treated 2×4 lumber to the post. Four of these braces should be at least a foot and a half long, and two of them a foot long. Attach two of the long boards horizontally at the bottom of the post, directly opposite from each other. A foot and a half above these, attach two more long pieces opposite each other. On the two “sides” remaining, attach the foot long boards about halfway in between the longer pairs, opposite from each other. This should provide enough bracing all around to prevent the post from eventually being uprooted under repeated omnidirectional onslaught.

Dig a rectangular hole two and a half feet deep and wide enough to allow the bracing to fit securely against the soil walls on all sides. If the hole is not deep enough, the makiwara will list to one side like the Tower of Pisa after you hit it a few times. If you are working in sandy or very loose soil, you may need to go a bit deeper. Once you have reached sufficient depth, us a tamping bar or the post itself to flatten out the bottom of the hole.  A shovel full of gravel will provide drainage as water seeps into the ground around the makiwara’s bottom end.

Place the post into the hole, making sure that the bracing is somewhat close to the walls. If it does not sit level, add some more gravel until it stays upright on it’s own. Once the post is in place, packing several fist-sized rocks tightly around the bottom will help to keep it securely anchored.  To pack the soil tightly around the post and bracing,  add a few scoops of dirt and then use a tamping bar (a 2X4 end will also work) to compress the soil all around the post. Splash some water into the hole to moisten this layer, then add more soil and back it down. Repeat until the hole is filled.  This will result in a much tighter fit than simply shoveling it all back in at once.

Concrete may seem like the more logical (and quicker) choice, but the 60-80 lbs required for such a job would add a considerable counterweight to the overall resistance of the makiwara. The resistance of a post set in unyielding concrete would most likely negate the recoil of the slats and cause excessive  strain in the joints of the user.

Initially, I tied the top ten inches of the post with cord per the various diagrams’ instructions. Tying it tightly only forced the slats together, eliminating resistance. After a few experimental whacks, I removed the cord entirely and found flexibility to be more satisfactory. It seems that the rope straw used in the example versions is there to provide an impact surface, which is not necessary if using modern materials  for padding. I initially used several yards of ¼” closed cell foam sheeting, wrapped in alternating layers down the length of the slats and bound with heavy duty duct tape. However, after two weeks of consistent use, I found that uppercuts and hook punches thrown with full body rotation (more on this later) tend to tear the tape and foam underneath. Hitting bare wood full on is not a pleasant surprise.  In light of this, I recommend using heavier foam rubber as padding.  I’ve found  a ½” thick foam camping ground mat to be satisfactory (Fig. D). Wrapping it around the makiwara and binding it with duct tape provides an excellent, forgiving surface. Be careful not to bind it too tightly, as this will compress the slats inward and lessen the amount of recoil. I recommend that beginners wrap the mat around the post at least three layers thick. After you’ve gained experience and confidence with the ude makiwara, the layers can be reduced to one or two.

Fig. D

Duct tape wrapped around the entire striking area will hold up quite well and cover any seams. 10 Be sure to use a good sturdy brand, like 3M.  For the more enterprising, a covering of leather, canvas or some other durable cloth can be made. If the makiwara is installed outside, it will be exposed to the elements. A heavy rain or a few days of foggy conditions will cause the wood in the slats to swell, decreasing resistance in the makiwara. It’s best to let it dry out for a day or two before attempting to strike it. Freezing temperatures in the winter and hot dry conditions in the summer will eventually “check” or crack the exposed top of the post. Placing a coffee can or bucket over the top in between uses helps keep the weather from deteriorating the post.

Next: Stick and Move- using the ude makiwara

The Ude Makiwara, Pt. 3

Part 3 of 6. Footnotes, references, and demonstration video clips will be posted in the last entry.

Exploratory Project
To make one of these makiwara for some hands-on investigation I used the diagram provided in Higaonna’s book as a model, and that is the design that I will describe here, installed outdoors. I have taken a few liberties as far as materials and measurements go, and have attempted to err on the side of caution when deciding upon the post’s diameter and the length of the cuts needed. The post should be of the following dimensions:  8’ long and between 4” and 5” in diameter.

Depending on your location, a suitably sized round post of treated lumber might be easy or difficult to come by (I was amazed to find that no suppliers in my area, a rural part of Virginia, carried these with regularity). You may be able to find one at your local lumberyard, especially in the gardening section during the Spring and Summer months. If that provides no results, call around: rural farm communities and farm supply co-ops may carry them.

If this search is fruitless, there are naturally available alternatives that have the added bonus of involving you in the process of making your training equipment.

Black locust is a quick growing hardwood that has strong natural rot resistant properties. In fact, locust posts are known to remain solid up to 70 years in direct contact with the ground (our landscape is dotted with grayed locust posts standing beside their decaying treated lumber counterparts). Red and Western Cedar are also naturally resistant to rot and bugs and will hold up for quite a while as well, but cedar is much softer than locust wood. Locust will resist impact and splitting as well as decay. The bottom line is that you should be able to hurl all types of abuse at it with no problems, and it will last in the elements for a very long time. Extra steps, such as cutting, hauling and debarking, make this option a bit more labor intensive than simply buying a post at the store, but the payoff is worth the trouble. Since I could not readily find a treated post, I decided to use a locust cut from my property. (Fig. A)

Fig. A

The log should be as uniform in diameter as possible; irregularities in the circumference will be magnified once padding is applied. If there are little knobs or angular protrusions where branches were cut, smooth them out with a drawshave or jack planer. Secondly, make sure that the log is sound and doesn’t have fractures in it from past damage, which could weaken the potential striking areas. A seasoned (well cured/dry) piece is preferable to a green one. Carrying the 8’ log through the woods makes for nice Sanchin training. You will also need to remove the bark from the log. A drawshave (pictured in Fig. B) will take care of this in short order. If you don’t have one of those lying around, a horizontally held machete or hatchet can be pulled  down the log to achieve the same result. Fig. B shows the debarked and smoothed log.

Fig. B

The next part is slightly more involved, regardless of materials used. In order for the post to be able to give equally from all sides, two cuts must be made into the log lengthwise, making an X shape when viewed from above (Fig. C). These cuts result in four flexible slats that each offer a resistance similar to a typical flat makiwara. For the 5″ diameter log pictured above,  I measured my cuts to be about 30 inches from the top end, or roughly halfway down the above-ground portion. Once the post was firmly in the ground I used a chainsaw to make the cuts, but found in later experimentation that securing the log horizontally at waist height makes for more accurate cutting– it’s also safer. I do not recommend this method for those unfamiliar with chainsaws and the requisite safety precautions. A sure hand is required, particularly since locust can give even a sharpened steel cutting chain trouble.  I recommend that a table saw with a guide be used for accuracy and safety’s sake.  If you are blessed with a willing building supply store, using the cutting services of the lumber department might also be a possibility worth looking into- it usually only costs a few dollars to have them cut something custom for you. Whichever route you take, keep in mind that there needs to be enough space between the slats to allow for them to travel and recoil when struck, so at least ¼ inch of wood needs to be removed from the cut (a chainsaw will do this in one pass). The slats will begin to splay outward slightly as the cuts lengthen (Fig. C).

Fig. C

Once your cuts are made, the slats must be tested for resistance. Too little is dangerous, too much is useless.  As with a tachi makiwara the wood should give under moderate static pressure. To test this, stand in a frontward stance and extend a reverse punch, placing the knuckles firmly against an individual slat. Pick up the front leg and lean into the post: the slat should flex inward under this pressure, but not collapse completely. You should be able to bounce lightly against it by lowering your back leg and pushing  forward (while still pressing the knuckles firmly against it).  Repeat all around the makiwara. If there is too little flexibility, i.e., the slat does not move at all, increase the depth of the cuts. Or, following a variant makiwara shown in Higaonna’s book, a piece of durable rubber placed in between the slats near the bottom of the cuts may resolve the problem by splaying them outward a little bit more and providing some shock resistance. An industrial rubber bushing or piece of an old bumper is a good candidate for this.

The Ude Makiwara: pt. 2

Part 2 of 6. Footnotes, references, and demonstration video clips will be posted in the last entry.

A Tale of Two Miyagis
Despite the general scarcity of information in historical writings, there are at least two modern sources (available in English) that reference the ude makiwara and provide diagrams. The first, Traditional Karatedo Okinawa Goju Ryu Vol. 1 by Morio Higaonna, contains illustrations of several different types of makiwara, all of which are less common variations on the theme.

The round design pictured is comprised of a post of unspecified dimensions, with two intersecting cuts made into it lengthwise from the top. These cuts create four sections that serve as striking surfaces in lieu of a single tapered board. Rope is shown wrapped around the upper portion as a striking surface. The result is a makiwara that can be hit from all sides with presumably equal amounts of give.

No instructions for construction or usage accompany the diagram. Nor can any specific conclusions about its history be assumed. However, Higaonna trained under Miyagi An’ichi, a top student of Goju-Ryu founder  Miyagi Chojun. According to a recent interview, An’ichi was Morio Higaonna’s sole teacher, and An’ichi himself had been Miyagi Chojun’s only student at times.7

Miyagi’s teacher, Higaonna Kanyro, studied various boxing systems  in China as a young man, which  presents the possibility that the ude makiwara was brought back to Okinawa by him.  He may also have encountered the basic round striking post in China and later created the version pictured in Traditional Karatedo. If either is the case, then the  ude makiwara design shown is an artifact of Naha karate training as taught and propagated by Higaonna, and later Miyagi et al,  although the possibility that the design came from another source certainly does exist.

Notes From Matsumura Shorin Ryu
Another variation on the ude design appears in Bishop’s Okinawan Karate.8 This information comes from an interview with Seiki Arakaki, a late student of the late Hohan Soken, who trained in the Matsumura Orthodox lineage. When discussing makiwara training, Arakaki states:

“There were, and still are, basically two types of makiwara, the flat board and the round post. The flat one is used for practicing the straight corkscrew punch and the round one, which has one or two splits to halfway down the middle, is used for training the fist, elbow and the side of the hand.”

As for the makiwara itself, a clear drawing with measurements for the height of the post is included but no information for the diameter. The diagram indicates a 200cm long post that has been cut lengthwise four times as opposed to twice, resulting in eight flexible sections instead of four. The top of the post is also shown wrapped with rice straw rope.

As a royal bodyguard and officer at the end of the second Sho dynasty, Matsumura Sokon himself would have been privy to knowledge gained from exchange trips to China and resident Chinese envoys. According to Kerr’s work Okinawa: The History of an Island People, in the days of the second Sho dynasty “residence at Tomari suggested scholarship and association with the Chinese living there.” Given his access to these resources, it  would not be difficult to imagine that Matsumura introduced the ude makiwara from a Chinese source into the larger community.

But cultural diffusion seldom takes one path- Kerr continues,  “The Naha man was presumed to be less conservative, to be more knowledgeable in the latest songs and dances, the newest patterns and styles of dress, the latest slang.” And the Naha community was likely exposed to a wide spectrum of fighting- the ports there were backdrop to a shifting mixture of sailors from China, Japan, Korea, Siam, Java, the Pacific islands and continental Southeast Asia. The ude makiwara may have been an intentional import form China, or an incidental one from  exchanges at the ports.

Back to Goju?

Its tempting to attempt to trace this makiwara back to Matsumura’s days (via Hohan Soken), but Arakaki had more than one teacher. As well as training with Hohan Soken in Matsumura Orthodox Shorin Ryu from the 1950’s on, Arakaki had also trained in Goju-Ryu under Seiko Higa, who in turn was a student of Kanryo Higaonna (and later, Miyagi Chojun). Arakaki’s Goju background brings into play the possibility that the ude makiwara shown is a product of his Goju Ryu exposure, along the same lines discussed earlier.

Arakaki might well have come by this makiwara via his training under either teacher and lineage- but it may be that he knew it from an unrelated source, or that it was simply common knowledge via one or both routes of cultural exchange with China. If that is the case, the ude makiwara shown should have equivalent cousins in Chinese boxing systems that may well still be in use, or referenced in older reference publications and manuals. While it does not provide us with a definitive history, this information does suggest that either or both the Matsumura Shorin Ryu and Naha (Goju/To’on) traditions practiced (and practice still) with this design, and that it may have come to Okinawa as a result of inentional or informal exchange with Chinese martial artists.9

Without notes on the specific origins of any of the three versions (a tapered pole, a post with two splits, a post with four splits), its difficult to place these designs in context with karate’s historical timeline, or to compare the different methods of using them. However, given the reference in Motobu’s book, inclusion in Morio Higaonna’s work and the dual possible origins presented in Bishop’s (via Arakaki), it is safe to assume that the ude makiwara was at one point a relatively common piece of equipment in the generalized Shuri, Naha and Tomari karate circles that has been overshadowed in propagation and modern use by its flatter relative.

The Ude Makiwara: Notes on History, Construction and Usage, Pt. 1

Part 1 of 6. Footnotes, references, and demonstration video clips will be posted in the last entry. Update: See bottom of this post for links to parts 2, 3, 4, 5 & 6.

The makiwara is a familiar sight to most that practice “traditional karate” of some form or another. A simple plank tapered to provide springy feedback for striking techniques is relatively common in the karate world. It is an aspect of Okinawan karate culture that has survived quite well amidst the cultural transitions and subsequent transformations of the art over the last century. In fact, its ubiquity is interesting in an age wherein stylistic boundaries, commercialism and political bickering often redefine what “is” and “isn’t” karate in a seemingly arbitrary fashion. Politics aside, the need to hit things is a happy universal.

Although the makiwara itself has made it to present day practice, the existence and specific histories of several variant designs are not so well known among modern exponents. The language barrier itself is probably one of the most significant causes of this gap in information, as there may well be detailed references that are simply unavailable outside of Japanese, and thus unknown to English readers. From the available writings, we can see that the majority of the karate men writing in the early 20th century mention the makiwara and emphasize it as a necessity for correct development of karate striking techniques.1 Several works, such as Gichin Funakoshi’s Karate-do Kyohan, also include diagrams for reference and suggestions for usage. In at least one of these sources the standard makiwara shares mention with a round variety described variously as a pole or ude makiwara. However, compared to other information published on the makiwara in general, the reference is brief, which leads one to wonder at the reasons for the lack of equal mention. In this article, we will explore the background of this somewhat lesser known variety (based on the available source information), methods of construction for the modern training space, and some observations on its usage. For purposes of clarity, the standard variety will be referred to hereafter as a tachi makiwara, and the round as ude.

Motobu’s Notes
The only available “classical” work that mentions an ude makiwara and includes specifications for construction is Motobu Choki’s 1932 Watashi no Karate Jutsu. In the section “How to Make & Use a Makiwara”, Motobu mentions that there are two varieties, the sage (hanging) and tachi (standing).2 He notes here that the tachi is “usually referred to as ‘The Makiwara’” and was in common use among many people. Following some notes on the construction of the sage variety, he introduces “another kind of tachi makiwara that is not so popular but used for developing both arms.”  It’s referred to simply as a makiwara made from a round pole. He goes on to describe this version in some detail:

“…A round shaped pole 210 cm in length with a 9 cm diameter, with 75 cm buried firmly in the ground, leaving 135 cm above exposed ground …the top should be 3 cm thick with about 30 cm length wrapped with rope. This makiwara can be struck from the front and sides by either hand to develop power.”

Sadly, no diagram of this design or any pictures of one being used are included. By the description given, we can envision the pole as tapering to a smaller diameter at its top to provide a springy target, but with equal give from all sides. Motobu points out that either hand may be used to strike this makiwara, which may at first seem entirely obvious, and something that one can do on the tachi as well. However, if interpreted to mean that it may be struck by either hand from any position, i.e. an elliptical forearm smash followed by a reverse punch, the statement makes more sense and hints at the practice of more dynamic exercises, which we’ll explore later. Given the diameter that is prescribed, it may also be likely that it was intended more for use as a tool for arm conditioning and forearm/hand/elbow strikes.

Seeing as how Motobu trained under an eclectic variety of teachers from the Shuri and Tomari areas (Anko Itosu, Sokon Matsumura, Kosaku Matsumora and Tokumine Shitsunen Pechin), the historical origin of these plans can only be speculated upon.3 He was probably introduced to this makiwara by one or more of the men he trained with, who in themselves constitute an impressive pedigree of teachers. Judging by the fact that he regarded it as important enough to include in a book, it is reasonable to assume that Motobu made use of it in his own training, and it is further possible that he passed knowledge of this makiwara on to his students, who may then have disseminated it to their own; this record seems to be lacking, though. However, based on his learning from several prominent teachers as well as his exposure to the Motobu family ti tradition (via his older brother, Choyu), it is highly probable that this ude makiwara has a significant history in pre-twentieth century training in one or more of the major centers of karate/ti practice and development. Motobu sensei’s enthusiasm for makiwara training can be attested to by contemporary descriptions of his hands.4

There is another 1930’s publication that mentions yet another variation on this variation. In kobudo preservationist Taira Shinken’s Encyclopedia of Okinawan Weapons, a makiwara specifically for training with the bo is shown in the Bojutsu section. The detailed illustration shows a solid round post with a crosspiece set horizontally through it near the top, and a hole bored through the center. Straw padding is wrapped around these “arms” and the top and lower surfaces of the makiwara.5 Taira notes that the makiwara should be of “average human height.” Although this version is for weapons training rather than empty hand, it does demonstrate the adaptability of the basic “striking post” concept. Functionally speaking, it is reminiscent of the pell, a medieval European weapons training post of Roman extraction.6

Part 2

Part 3

Part 4

Part 5

Part 6

(Why) Don't (you) tase me, bro!

Last summer at the TKRI/Seijinkai VA Gasshuku, we ran a live sparring drill that involved assigned responses within a free exchange. To summarize, two partners are involved in some light randori (standing free wrestling), basically jockeying for position and control in the body-to-body grappling/clinch range. Each partner is assigned a skill set- A: grappling/restraints or B: striking.  At a randomly given command, both partners immediately attempt to apply their skill set to their partner to some clear finish such as a pin or flurry of strikes that make further action difficult or impossible. The training benefit is in forcing both partners to use their skill set both offensively and defensively while under attack. Suddenly the activity goes from trying to control your partner and stay on your feet to very aggressive takedowns, tackles and throws against close range knees, elbows, fists etc. The drill was an attempt to simulate the randomness and aggression of a real fight, but to also provide enough limitation that each partners was forced to deal with a specific set of attacks while intentionally using a specific set of responses- this really highlights the strengths and weaknesses of both skill sets at close range against resistance.

But that just wasn’t enough fun by itself- we at TKRI believe in a dumping all the Lego’s onto the floor, as it were, and seeing what we can put together. So round two followed the same parameters, except now one partner in each group had a wooden dowel cut to the size of a 7-9″ hunting knife. This was to be stashed anywhere that the user felt they might hide it on their body- tucked in the belt line, socks, inside shirt, etc.  The drill started as described above, but after the command, the person with the “knife” was free to attempt to pull it and use it on their partner. Suffice to say, many surprises were had by all involved. Most defenders were “stabbed” and “cut” numerous times before any sort of control was established, and it was very clear that serious injury or death would have resulted.  Some found that the draw happened so fast they were never aware of it before it hit them. A lucky few were able to stuff the draw, or force the attacker to drop the weapon- after which the fight continued to see who could regain control over the weapon and use it on their partner.

Seeing as this all happened in the context of rugged shoving, tripping, tackling and hitting, I felt that the drill was a pretty good approximation of the dangers inherent in close range fighting with a person who may or may not be carrying a weapon. All too often we assume that a weapon will be drawn and obvious before the attack, and that the weapon is the main (or sole) attack. This drill effectively dissolves that particular illusion. Due to the nature of the exercise, and the fact that we are responsible for the safety of our training partners, there are limitations to this sort of thing- I can’t elbow smash someone in the temple as they tackle, or twist a shoulder completely out of socket. Despite our honesty and attention to where the weapon was hitting us, there wasn’t any visceral, undeniable feedback.  It’s one thing to cognitively grasp that a training knife has touched you in a specific location in such a way that injury would occur with a real knife- but the shock of actual pain is something else altogether, and carries with it emotional and physiological responses that are not controllable and leave you exposed to the attacker (there goes “Mushin” and the other “Samurai composure” tripe).

So when I came across this little gem (below) today, I immediately recognized a solution to a few of these limitations. The clip shows some US Army CQC training along the same lines, but the weapon in this case is a low-voltage taser.  Someone in the training group hides this taser on their person, and no one knows who has it- until it comes out during a roll on the floor. A struggle for dominance of the opponent might suddenly turn into a fight to control a weapon that is inches away. And as you will see, being hit with the taser produces a very immediate and reflexive response that makes the outcome woefully clear. Leave it to the Army to drive the point home! (note: somehow, this turned from a simple link with a comment to a few paragraphs of rambling, but putting it in a karate training context is useful). Enjoy!

View the clip Here

DIY Multi-Target Grid and “Maize” Bag

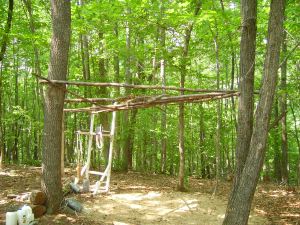
When my wife and I began building our home a few years ago we needed a place to store our tools at the worksite. Living in a camper generally is not spacious as it is, and both of our cars were full of construction paraphenalia. So we decided to build a temporary lean-to out of saplings and a tarp until a more substantial shed could be built. At some point during all of this, I realized that the lean-to was in the perfect spot for an outdoor training area. It also lent itself well to serving as a framework upon which to attach all sorts of improvised punching targets. This idea took hold in my brain and mutated until I found myself with a grid work of swinging targets that provides excellent self-training for reaction skills and timing .

The more targets I added, the more difficult (read: fun) the challenge offered by the contraption became. Starting out dodging/striking one target is fairly simple. But once the other ones begin to move around, the number of objects in  the visual field multiplies. Hitting target A is the goal, but targets B, C and D may be on their way back around to smack you. Hitting any one of them changes it’s trajectory and speed, requiring the user to track objects that may be out of the visual range while also focusing on  the target at hand, hitting it and evading the ones that are moving in from several directions- a bit like overclocking the brain. Also a bit like trying to shuffle through a crowd, or deal with several people approaching at once. The targets are free to swing so the movements are fairly unpredictable, especially when several are moving at once. There are many, many possibilities for training with this setup, both solo and with partners. I will post some games and drills later on, but for now I will show the rebuilding process and it’s outcome. Obviously, saplings are a good, free building material for me- however, any suitable materials can be used indoors or out to make something that achieves the exact same goals.

The original structure

The original grid.

Various targets from the grid.

 As can be seen in the pic, the original was a bit low and not in the best of shape at the end. I tore it down and pulled out the poles that were still in good shape to be reused.

Frame in place.

The new one is 7″ high and attached to four trees as opposed to three, adding several feet of space to move in. The height also allows for targets to be moved to different levels as needed.

The first new cross members in place.

New grid completed from hardwood saplings, 2-3″ diameter. Many are from the original grid.

The reinforced grid, with several targets attached, ready to use. Tennis balls provide smaller, lighter targets to be evaded and parried; the larger targets are 2-liter soda bottles wrapped in foam sheeting and duct tape, secured via a knot through the bottom of the cap and filled with plain ol’ water. The bottle targets provide a suprisingly firm surface that will actually respond with more firmness the harder they are hit. The round shape requires proper hand/knuckle alignment to provide feedback, as a grazing blow will simply roll off.  A good shot will knock it squarely away from the strike. And the best part is, they’re more or less free, easy to make and highly portable.

Detail of a 2-liter soda bottle “maize bag.” Don’t be fooled- when filled with water, these are surprisingly dense and hard to hit cleanly

Eventually I hope to have as many as a dozen different targets hanging off the grid. I’ll post more pictures as it develops. I also hope to get some good video of it being used to post as well, along with some of the games and drills- I will have several volunteers from Camp TKRI in just a few weeks….

Next up: a kakiya.